
Showing posts with label Blogger. Show all posts
Showing posts with label Blogger. Show all posts
16/12/2017
3 Reasons Why Blogging Will Boost Your Business

Building your business can be a difficult task. You can put hundreds of hours of effort into the business, but if you still don’t have important components, you will not be successful. Today business owners are realizing that blogging boosts business. Blogs are typically only seen as personal places to express yourself and your views. The truth is however the blogs are also great places to reach people about your business or your products. There are several ways to do this type of blogging.
The best way a business can use blogging to boost their business is by taking part in the blogs of others. You can easily create quality posts with your business in mind without needing to set up a blog of your own. Try finding blogs that pertain to the area of business you are in. This will help you get started. With millions of blogs out there, you should be able to find some with no problem. Choose to post on all of them, or choose the few that get the most activity. Then begin posting. When you do, you will see positive results come in. If you are still curious about how this can boost your business, check out these three reasons blogging boosts business.
Quick Name Recognition
The fastest way to get your business’s name out in the public is to make it known to your targeted marketing group. If you want to get your company’s name out to men who like fishing, then you can find a blog that is about just that. When you find the blogs pertaining to this marketing group, post useful and intelligent information about topics that pertain to your company. You might not want to sound like an advertisement. Think about responding to another comment and simply tagging your signature with your company’s website. This is a subtle way to get their attention. The more you post on blogs, the more widely known your company’s name will become with the select marketing group. When they tell their friends and family about the site then your consumer group will have grown even more. This is a fast way to get started. You will have to invest some time however. At least an hour a day can be used for this type of task.
Consumer Testimonies
Your company might even think about hiring professionals to blog for your company. You can offer these employees products to try and give them the task of finding blogs where they can appropriately “praise” the product. By paying these people to do the task, you will be getting the work done that you need without having to devote much time. Consumer testimonials go a long way with other consumers. If these bloggers are productive enough, you will see an increase due to it.
Building Relationships
Smart business owners know that they can go further with the help of others. A great way to connect and build relationships with other businesses is via their blog. If you are a regular poster who values their business, they will be more likely to work with you.
Working together with advertising is a great idea. You can swap ad space for no fee if you like. These are great things for business owners and are easy to get into when you blog regularly.
As you can see, blogging can be a great way to do business. It may seem like tricky advertising, and it is in some ways. However, it is free advertising that does the same thing as a commercial on television does. It reaches a targeted marketing group and lets them know your company’s name, products, and sometimes offers an endorsement. Overall, it is an effective way to get your business out there. When people have no idea who you are, they are not going to feel comfortable working with you. The better your reputation is, the more likely they will trust you.
When you have no reputation at all, they will not trust you either. So, even if you just want to use blogging to build your company’s reputation, it will be worth your while. Give it a try and see what type of results you can get using these tips.
13/08/2017
How To Add Adsense ( In-feed Ad ) Ad Unit To Blogger To Increase Revenue
Hello everyone. You want to increase your revenue on Adsense? In this article i am gonna show you how to add the ( In-feed Ad ) to blogger. it is really good to increase your Adsense revenue.
Just follow steps below:
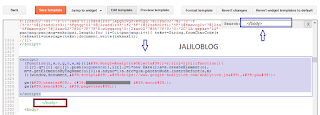
Save and Copy the code and Paste it above the tags , make sure to paste it right above
<!--Ad-->
<b:if cond='data:post.includeAd'>
Now, from your blog's layout , select the numbers of the posts you want to display on your homepage.
 |
| tablet picture |
See example : DEMO
- Sign in to your Adsense account > My Ads > New ad unit > select ( In-feed Ad ). You can customize the Ad unit or leave it as it is.
- Sign in to blogger, Select Theme > Edit HTML
- BACK UP YOUR TEMPLATE PLEASE
- By using - Ctrl+f - Search for: <b:if cond='data:post.includeAd'>
<!--Ad-->
<b:if cond='data:post.includeAd'>
Save and Copy the code and Paste it above the tags , make sure to paste it right above
<!--Ad-->
<b:if cond='data:post.includeAd'>
example:
-----Your Code Here ---
<!--Ad-->
<b:if cond='data:post.includeAd'>
Click Save. <b:if cond='data:post.includeAd'>
Now, from your blog's layout , select the numbers of the posts you want to display on your homepage.
Watch this fast video it may be easier to understand
27/01/2017
How To Create and Submit Sitemap To Google Webmaster Tools
 |
| google webmaster tools picture |
Hello friends, Today I'm going to show you how to create a sitemap for your website or blog and submit it in Google webmaster tools. It is easy just follow the steps below.
First of All you need to sign in to Google webmaster tools.
- Select the blog you want from the top right , as you see on the picture
 |
| google webmaster tools picture |
- On the left side select Crawl then Sitemaps
 |
| google webmaster tools picture |
- Go to the following website http://ctrlq.org/blogger and create a sitemap, Just put your blog URL and click Generate Sitemap
 |
| google webmaster tools picture |
- After the sitemap being generated copy the part the after / atom.xml etc...
 |
| google webmaster tools picture |
- Go back to Google webmaster tools and click on the red button ADD/TEST SITEMAP. and paste what you copied in the box and hit submit ( you can test it first )
 |
| google webmaster tools picture |
 |
| google webmaster tools picture |
- Click refresh , That is it we are finished submitting sitemap to the Google webmaster tools successfully
 |
| google webmaster tools picture |
 |
| google webmaster tools picture |
- Now, it will show up to you pending. Just let it work and be patient until all your pages are indexed by Google.
Also you can use below ones :
- sitemap.xml
- feeds/posts/default
- atom.xml
Enjoy your day, can you shoot me with a comment ? Thanks
19/01/2017
How To Set Up Google Analytics Account For Blogger
 |
| Google Analytics |
The analytic tool is very important for every webmaster.
Google Analytics allows you to see visitors in real time, male or woman, age, popular pages, visitors source and many more.
Let's get started
- Open the following https://analytics.google.com
URL and Sign Up on Google Analytics

Google Analytics - Select website and fill out the requirements, as you see on the Picture, Then click Get Tracking ID

Google Analytics - Once you click on it you will get the Tracking ID and code

Google Analytics - Now, Go to your blogger dashboard and click on Settings then Other. You will see Google Analytics (Analytics Web Property ID) simply copy the number from Analytics Account. It should look like this UA- 00000000-1 and paste it in the box then click save.

Google Analytics - Go back to blogger, Edit HTML and find </body> , past the code just above it. Click Save.
Google Analytics That is All


11/12/2016
Add Rating Gadget To Every Post On Blogger - Thumb Up or Down

Hello readers and followers of Jaliloblog, Today i am gonna give you an awesome gadget for blogger or website, This gadget is Rate this post. on top of every post on your blog.
why is it good to have this gadget installed on your blog?
It shows you the rank and quality of the posts that you post on your blog, Either good or bad from your blog's readers and followers.
Demo: Check Here
How to install the gadget?
- First of all log in to your Blog, From dashboard select Template, Back up your template then click Edit HTML and by using Ctrl+F, Find this </head> and post the code bellow above it
<script type="text/javascript" src="http://bilokr.googlecode.com/files/jquery.min.js.txt"/>
- Search for <data:post.body/> and past the code bellow above it and click Save. Done!
<b:if cond='data:blog.pageType != "static_page"'>
<div expr:id='"labels_" + data:post.id' style='display: none; visibility: hidden;'>
<b:if cond='data:post.labels'>
<b:loop values='data:post.labels' var='label'>
<data:label.name/>,</b:loop></b:if></div>Rate this posting: <div expr:id='data:post.id' class='ffbs_rate'>{[['<img src="http://static.graddit.com/img/thumbup_small.png"/>'],['<img src="http://static.graddit.com/img/thumbdown_small.png"/>']]}</div>
<script type='text/javascript' expr:src='"http://graddit.com/rate/eng/2/" + data:post.id + "?id=" + data:post.id + "&labels=labels_" + data:post.id + "&info=info-" + data:post.id + "&info_delay=2&url=" + data:post.url + ""'></script></b:if>
03/12/2016
How To Customize And Add Sidebar Sharing Buttons To Blogger From AddThis

Hello dear JalilobloG followers and readers, Today i'm gonna show you how to add a Side Bar Sharing Buttons, I want to add widget has Facebook,Twitter,Google plus and Print. There are too many services that you can add if you wish.
Demo: Here
Demo: Here
- First Sign up on AddThis. Here you go Sign Up www.addthis.com
- Sign In and then Click on Dashboard

- Select Tools and then click on ADD NEW TOOL

- Now click Share Buttons, Select Sidebar ones and click Continue


- Click Save and Continue , You can put that buttons on the right side of your blog, Show numbers of shares and select more buttons as well.

- Click on GET THE CODE on the upper left side, make sure you select HTML WEBSITE

- Sign in to blogger, Select Template then Edit HTML, Find </body> and past the code that you got above </body>. Click Save and done.


Watch Quick Video
Easy Way To Add YouTube Subscribe Button to Blogger

Hello JalilobloG readers and followers, Do you have a blog or website? Also do you have a YouTube Channel? If yes I'm sure you need to add Subscribe Button to your blog.
Today I am gonna show you an easy way way how to add a Subscribe button to blogs and websites in easy and fast steps.
First of all, Go to this link :https://developers.google.com/youtube/youtube_subscribe_button
- Replace GoogleDevelopers with your Channel's Name on YouTube
- Select default or pic something also. Up to you
-Select a Theme either default or dark. As you like
- If you want to show the number of your subscribers beside the button keep it as it is default (shown). Also you can hide it as well.
- Look at the preview in the button and if you like it

- Copy & Past the bellow code in to an HTML/JavaScript Gadget on blogger and place it anywhere on your blog / website.

All Done ✅
01/12/2016
Add Number of Views on Every Post on Your Website

Today i am going to share with you how to add the number of views gadget on each post on blogger. After trying adding so many times without any good result, Now i have it work 100%.
Follow the steps bellow:
First of all, you have to sign up on FIREBASE.
Sign up : ( Here )
And after signing up sign in to the website, in the APP NAME add your website name and a link will be created automatically. It should be like this : Yourname.firebaseIO.com
Follow the steps bellow:
First of all, you have to sign up on FIREBASE.
Sign up : ( Here )
And after signing up sign in to the website, in the APP NAME add your website name and a link will be created automatically. It should be like this : Yourname.firebaseIO.com
Look at pictures:
 |
| 1 |
 |
| 2 |
Now go to Edit HTML, back up your template and use Ctrl + F , Look for : ]]></b:skin>
- Past the bellow code above it
/*-------- Post Views ----------*/
#views-container {
width: 75px;
float: right;
}
.mbtloading {
background: url('https://blogger.googleusercontent.com/img/b/R29vZ2xl/AVvXsEiP-PvBmT18CMmjdLVzZTAf3j5uc0h45j5n2RUfLd1Aa4mNBK0M7iISB-yMbOxw2ONGW0ithcOpT5NSRjyd62HCYOUmscknz129uxB3JU02-7htir5U-F8JT-IteD6wHPvxOc0M6XlchMqB/s320/mbtloading.gif') no-repeat left center;
width: 16px;
height: 16px;
}
.viewscount {
float: right;
color: #EE5D06;
font: bold italic 14px arial;
}
.views-text {
float: left;
font: bold 12px arial;
color: #333;
}
.views-icon{
background: url('https://blogger.googleusercontent.com/img/b/R29vZ2xl/AVvXsEg-NfKD7-WU1hbYXO2biWtX7v53AbBsy0fCInvAcviTRpVEcZFaLnWv8NAbGwGGOJIpRzQ1viWEnxuMRV76jPz8ozm6ddcXg_J0psgXaH6w5PGZku-DB8QDqlFDHQDQ3ey3O1j-wMnBGtk/s1600/adnaneg.png') no-repeat left;
border: 0px;
display: block;
width: 16px;
height: 16px;
float: left;
padding: 0px 2px;
}
- Now find : </body>
- Copy and paste the code bellow above it
<!-- Post Views Script by MBT -->
<script type='text/javascript'>
window.setTimeout(function() {
document.body.className = document.body.className.replace('loading', '');
}, 10);
</script>
<script src='https://cdn.firebase.com/v0/firebase.js' type='text/javascript'/>
<script>
$.each($('a[name]'), function(i, e) {
var elem = $(e).parent().find('#postviews').addClass('mbtloading');
var blogStats = new Firebase("https://yourname.firebaseIO.com/pages/id/" + $(e).attr('name'));
blogStats.once('value', function(snapshot) {
var data = snapshot.val();
var isnew = false;
if(data == null) {
data= {};
data.value = 0;
data.url = window.location.href;
data.id = $(e).attr('name');
isnew = true;
}
elem.removeClass('mbtloading').text(data.value);
data.value++;
if(window.location.pathname!='/')
{
if(isnew)
blogStats.set(data);
else
blogStats.child('value').set(data.value);
}
});
});
</script>
NOTE: change yourname with your name that you created on firebase
- Now find: <data:post.body/>
- Paste the code bellow right above it
<!-- Post Views Counter by MBT-->
<div id='views-container'>
<span class='views-icon'/><div class='views-text'>
Views:</div>
<div class='mbtloading viewscount' id='postviews'/>
</div>
Note: You may find more than once of (<data:post.body/>) , Keep trying adding the code above each one until it works for you.
Save your template and enjoy!
Do not forget to share the article with your friends and leave a comment.
! DO NOT re-post this article's codes as new post on your blog., Just use them to add the gadget to your blog.
29/11/2016
Add a very Nice Search Box

Hello everyone
Today I am going to give an amazing gadget, It is a search box for your bog or website. You can add it easily
Follow the steps bellow
Sign in to your blog , and select Layout
Click Add a Gadget , select HTML/JavaScript and copy & past the code bellow into the box . Add a tittle .ex Search This Blog or what ever you want and click Save
Code
<div id='search-wrapper'><style type='text/css'> .form-wrapper { width: 290px; padding: 5px; margin: 10px auto; overflow: hidden; border-width: 1px; border-style: solid; border-color: #dedede #bababa #aaa #bababa; -moz-border-radius: 10px; -webkit-border-radius: 10px; border-radius: 10px; background-color: #f6f6f6; } .form-wrapper #search { width: 210px; height: 12px; padding: 10px 5px; float: right; font: bold 18px 'Arial', 'trebuchet MS', 'Tahoma'; border: 1px solid #ccc; -moz-border-radius: 3px; -webkit-border-radius: 3px; border-radius: 3px; } .form-wrapper #search:focus { outline: 0; border-color: #aaa; } .form-wrapper #search::-webkit-input-placeholder { color: #999; font-weight: normal; } .form-wrapper #search:-moz-placeholder { color: #999; font-weight: normal; } .form-wrapper #search:-ms-input-placeholder { color: #999; font-weight: normal; } .thumb{position:relative;left:4px;top:1px;} .form-wrapper #submit { float: left; border: 1px solid #00748f; height: 32px; width: 60px; padding: 0; cursor: pointer; font: bold 15px Arial, Helvetica; color: #fafafa; text-transform: uppercase; background-color: #0483a0; -moz-border-radius: 3px; -webkit-border-radius: 3px; border-radius: 3px; } .form-wrapper #submit:hover, .form-wrapper #submit:focus { background-color: #91bc1e; } .form-wrapper #submit:active { outline: 0; } .form-wrapper #submit::-moz-focus-inner { border: 0; } </style> <div class='rss'> <form action='/search' class='form-wrapper' method='get'> <input id='search' name='q' placeholder='' type='text'/> <input id='submit' type='submit' value='Search'/> </form></div></div>
Put the search box anywhere you want on your blog
You like this article? Share it Please
25/11/2016
Add Very Nice Social Network Sharing Buttons

Hi everyone,
Today i will give you an awesome Social Network Sharing Buttons to add to your blog, This gadget has the following networks:
Facebook , Twitter , Google plus , Linked In
Demo:
How to add it:
- Sign on to blogger and hit Template then Edit HTML.
- By using Ctrl +f and find <data:post.body/>
- By using Ctrl +f and find <data:post.body/>
- Past the following code bellow <data:post.body/>
<b:if cond='data:blog.pageType == "item"'><div class='tombol-berbagi-arlina'><div class='tombol-berbagi-arlina-fb'><a class='tombol-berbagi-fb' expr:href='"http://www.facebook.com/sharer.php?u=" + data:post.url + "&title=" + data:post.title' rel='nofollow' target='_blank'/><a class='tombol-berbagi-fb-label' expr:href='"http://www.facebook.com/sharer.php?u=" + data:post.url + "&title=" + data:post.title' rel='nofollow' target='_blank'> Share on Facebook </a></div><div class='tombol-berbagi-arlina-tw'><a class='tombol-berbagi-tw' expr:data-text='data:post.title' expr:data-url='data:post.url' href='http://twitter.com/share' rel='nofollow' target='_blank'/><a class='tombol-berbagi-tw-label' expr:data-text='data:post.title' expr:data-url='data:post.url' href='http://twitter.com/share' rel='nofollow' target='_blank'>Share on Twitter</a></div><div class='tombol-berbagi'><a class='tombol-berbagi-gp' expr:href='"https://plus.google.com/share?url=" + data:post.url' rel='nofollow' target='_blank'/><a class='tombol-berbagi-gp-label' expr:href='"https://plus.google.com/share?url=" + data:post.url' rel='nofollow' target='_blank'> Share on Google +</a></div><div class='tombol-berbagi'><a class='tombol-berbagi-lin' expr:href='"http://www.linkedin.com/shareArticle?mini=true&amp;url=" + data:post.url + "&amp;title=" + data:post.title + "&amp;summary=" + data:post.snippets' rel='nofollow' target='_blank'/><a class='tombol-berbagi-lin-label' expr:href='"http://www.linkedin.com/shareArticle?mini=true&amp;url=" + data:post.url + "&amp;title=" + data:post.title + "&amp;summary=" + data:post.snippets' rel='nofollow' target='_blank'>Share on LinkedIn</a></div></div></b:if>
- Now find ]]></b:skin> and past the following code above it
/* CSS Share Button */.tombol-berbagi-arlina{display:block;position:relative;height:43px;line-height:43px;padding:10px;border-top:1px solid #dadada;border-bottom:1px solid #dadada;margin:auto}.tombol-berbagi-arlina-fb,.tombol-berbagi{float:left;width:21%;padding:0 10px;height:inherit}.tombol-berbagi-arlina-tw,.tombol-berbagi,.tombol-berbagi-lk{float:left;width:21%;height:inherit;padding:0 10px;border-left:solid 1px #dadada}.tombol-berbagi-fb,.tombol-berbagi-tw,.tombol-berbagi-gp,.tombol-berbagi-lin,.tombol-berbagi-pi{float:left;display:block;background:url('https://blogger.googleusercontent.com/img/b/R29vZ2xl/AVvXsEjOQxR0_IJ5Zv3hMNCUr2wgPNNnTY78e2DaEf5Tdm68CI8fU_dF9FuLXwQKlNKdwZbqbV5PuM4_288RZ5dyUHU1j_xjoo96tgBrnJlYnJubSuquFxr8gqWoxgWRz3strNlNEJ5-uRwN09Uc/s1600/share.png') no-repeat;width:42px;height:41px;margin-right:3px}.tombol-berbagi-fb-label{color:#2d609b}.tombol-berbagi-fb-label,.tombol-berbagi-tw-label,.tombol-berbagi-gp-label,.tombol-berbagi-lin-label{float:left;width:58px;height:inherit;font-size:12px;font-family:'Open Sans Bold',Arial,sans-serif;line-height:14px;margin:5px 0 0 4px}.tombol-berbagi-tw{background-position:0 -43px}.tombol-berbagi-tw-label{color:#00c3f3}.tombol-berbagi-gp{background-position:0 -86px}.tombol-berbagi-gp-label{color:#f00}.tombol-berbagi-lin{background-position:0 -129px}.tombol-berbagi-arlina a{color:#999;transition:all .3s;}.tombol-berbagi-arlina a:hover{color:#7cb0ed}@media only screen and (max-width:640px){.tombol-berbagi,.tombol-berbagi-arlina-fb{display:inline-block;float:none;width:48%;padding:0;height:inherit}.tombol-berbagi,.tombol-berbagi-arlina-tw,.tombol-berbagi-lk{float:left;width:48%;padding:0;border-left:0}}
Click Save and congrats
21/11/2016
How to Set up Custom Domain on Blogger with Godaddy Step by Step

Hello all, Today I'm going to explain how to set up a custom domain on blogger with godaddy , First of all you need to buy a domain name that you like from godaddy. And when you get it just follow the steps bellow:
- Sign on to Blogger and then select settings, Click on set up a third - party URL for your blog

- On the above box type your domain name it must be like this "www.mydomain.com" then click save. You will get an error 12. Like you see bellow. Don't close the page.

- Now go to your account on godaddy and select DNS Zone File and click Add Record

- You will see the pop up page , Select CNAME (Alias)

- Go back to blogger and copy and past the lines that on box on the picture, back to godaddy and add www in the top box then click Add Another , copy ghs.google.com and past it in the button one, then copy the other ones and add one in the above after you delete www and the other bellow it and click Finish
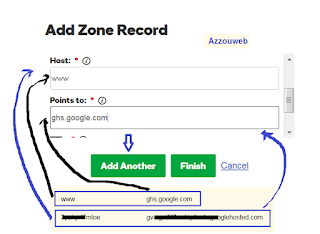
- On Godaddy page delete www, it is highlighted with yellow.

- Now we need the four IP's. To get them go back to blogger and click on settings instructions

- A page will open in another tab on your browser, scroll down and click Use a top-level domain

- Bellow you will see the 4 IPs

- On Godaddy page click Add Record , again.

- Select A (Host)

- Now we have to add all IPs there, first we type @ on above box and we'll past all IPs in box bellow. Add the first IP and click Add Another and add the second IP and click Add Another , and add the third one and click Add Another and add the last one then click Finish

- Now, delete the highlighted line and click Save Changes

- Last step, Go back to blogger click Edit beside the address and check the little square and click save.


Congratulations you've got it. Leave comment if you have a question.
05/11/2016
Add Like and Dislike Buttons

Hello guys,
Today's gadget is 2 buttons. One for Like and one for Dislike. You can add to your blog or website so people will show you their opinion about the topic you have wrote. Also, it has sharing option. If one of visitors clicked LIKE the option of sharing on social websites will show up for them. Thus, they also can share the article.
How to add it?
From Layout chose Add Gadget, HTML/JavaScript then past the code bellow and click Save!
Code:
<script type="text/javascript" src="http://100widgets.com/js_data.php?id=259"></script>
100widgets
Subscribe to:
Posts (Atom)


