
21/11/2016
How to Set up Custom Domain on Blogger with Godaddy Step by Step
Blogger ,
Blogging Tips ,
eHow

Hello all, Today I'm going to explain how to set up a custom domain on blogger with godaddy , First of all you need to buy a domain name that you like from godaddy. And when you get it just follow the steps bellow:
- Sign on to Blogger and then select settings, Click on set up a third - party URL for your blog

- On the above box type your domain name it must be like this "www.mydomain.com" then click save. You will get an error 12. Like you see bellow. Don't close the page.

- Now go to your account on godaddy and select DNS Zone File and click Add Record

- You will see the pop up page , Select CNAME (Alias)

- Go back to blogger and copy and past the lines that on box on the picture, back to godaddy and add www in the top box then click Add Another , copy ghs.google.com and past it in the button one, then copy the other ones and add one in the above after you delete www and the other bellow it and click Finish
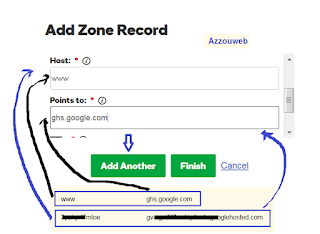
- On Godaddy page delete www, it is highlighted with yellow.

- Now we need the four IP's. To get them go back to blogger and click on settings instructions

- A page will open in another tab on your browser, scroll down and click Use a top-level domain

- Bellow you will see the 4 IPs

- On Godaddy page click Add Record , again.

- Select A (Host)

- Now we have to add all IPs there, first we type @ on above box and we'll past all IPs in box bellow. Add the first IP and click Add Another and add the second IP and click Add Another , and add the third one and click Add Another and add the last one then click Finish

- Now, delete the highlighted line and click Save Changes

- Last step, Go back to blogger click Edit beside the address and check the little square and click save.


Congratulations you've got it. Leave comment if you have a question.
Subscribe to:
Post Comments (Atom)


Well written and thanks for your guide…It works perfect…
ReplyDeleteHi and thanks very much for this tutorial. Your instructions are very useful!
ReplyDeleteWell written and thanks for your guide…It works perfect…
ReplyDelete